No-Bake Energy Balls Recipe | Healthy Protein Snacks
No-bake energy balls are the ultimate healthy snack that tastes like a treat but fuels your body with wholesome ingredients. These little powerhouses are packed with protein, fiber, healthy fats, and natural sweetness - all rolled into convenient, poppable bites that satisfy cravings while keeping you energized throughout the day. Whether you call them energy balls, protein balls, or energy bites, they're the perfect solution for busy mornings, post-workout fuel, afternoon slumps, or healthy dessert alternatives.
What makes energy balls so popular? They require absolutely no baking, come together in just 15 minutes, and use simple pantry staples like oats, nut butter, honey, and mix-ins like chocolate chips or dried fruit. They're naturally sweetened, so you can feel good about eating them - no refined sugars, artificial ingredients, or mystery additives like store-bought protein bars. Plus, they're infinitely customizable to your taste preferences and dietary needs.
Energy balls are also incredibly practical for meal prep. Make a big batch on Sunday and you have grab-and-go snacks for the entire week. They're perfect for lunchboxes, gym bags, desk drawers, or anytime you need a quick energy boost without reaching for junk food. Kids love them, adults crave them, and they're suitable for almost any diet - vegan, gluten-free, dairy-free, or even keto with simple substitutions.
This foolproof recipe delivers perfectly textured energy balls that hold together without being too sticky, taste delicious without being overly sweet, and provide sustained energy without the crash. You'll learn the secrets to the ideal consistency, flavor combinations that work, storage tips, and endless variations. Let's make the best energy balls you've ever tasted!
Prep Time: 10 minutes
Chill Time: 30 minutes
Total Time: 40 minutes
Makes: 20-24 energy balls
Difficulty: Easy
Cuisine: American, Healthy Snack
Diet: Vegetarian, can be vegan, gluten-free
No-Bake: No oven required!
Meal Prep Friendly: Perfect for weekly prep
Kid-Friendly: Loved by all ages
Ingredients
Base Recipe (Classic Peanut Butter Energy Balls):
1 cup old-fashioned rolled oats (not instant)
1/2 cup natural peanut butter (creamy or crunchy)
1/3 cup honey or maple syrup
1/2 cup ground flaxseed (or chia seeds)
1/2 cup mini chocolate chips (semi-sweet or dark)
1 teaspoon vanilla extract
Pinch of salt (about 1/4 teaspoon)
Optional Add-Ins & Variations:
1/4 cup shredded unsweetened coconut
1/4 cup chopped nuts (almonds, walnuts, pecans)
1/4 cup dried fruit (cranberries, raisins, dates)
2 tablespoons protein powder
1 tablespoon cocoa powder (for chocolate version)
1/2 teaspoon cinnamon
Zest of 1 orange or lemon
For Rolling/Coating (Optional):
Shredded coconut
Crushed nuts
Cocoa powder
Sesame seeds
Chia seeds
How to Make No-Bake Energy Balls
Instructions:
Step 1: Gather and Measure Ingredients
Line up all ingredients: Before you begin, measure out all your ingredients and have them ready. Energy balls come together quickly, so mise en place (everything in place) makes the process smooth and easy.
Use the right oats: Important: Use old-fashioned rolled oats, NOT instant oats or steel-cut oats. Old-fashioned oats have the perfect texture - they provide structure without being too hard or turning to mush. Quick oats will make the mixture too soft and won't hold together well.
Choose your nut butter: Natural peanut butter (the kind that separates with oil on top) works best because it's not too thick. If using regular peanut butter (like Jif or Skippy), you may need to add 1-2 tablespoons more oats because it's softer. Almond butter, cashew butter, or sunflower seed butter all work too!
Room temperature matters: If your nut butter is cold from the refrigerator, let it sit at room temperature for 15-20 minutes or microwave briefly (15-20 seconds) to soften. Cold nut butter is difficult to mix and won't incorporate smoothly.
Step 2: Mix the Ingredients
Combine in a large bowl: In a large mixing bowl, add all the base ingredients: rolled oats, peanut butter, honey (or maple syrup), ground flaxseed, mini chocolate chips, vanilla extract, and a pinch of salt.
Mix thoroughly: Using a sturdy spoon, spatula, or your hands (easiest!), mix everything together until completely combined. This takes some effort - the mixture will seem stiff at first. Keep mixing! You want every oat and flaxseed coated with the nut butter and honey. Pro tip: Using your hands is actually the best method - you can feel when everything is evenly distributed and properly mixed.
Check the consistency: The mixture should hold together when pressed but not be overly sticky or wet. Grab a small amount and squeeze it in your palm - it should form a cohesive ball without falling apart. If too dry/crumbly: Add more honey or nut butter, 1 tablespoon at a time. If too wet/sticky: Add more oats or flaxseed, 1 tablespoon at a time.
Add optional mix-ins: If you're adding shredded coconut, chopped nuts, dried fruit, protein powder, or cocoa powder, fold them in now. Mix until evenly distributed throughout the mixture.
Taste and adjust: Pinch off a tiny bit and taste it (before adding chocolate chips if you haven't yet). Does it need more sweetness? Add a bit more honey. Want more peanut butter flavor? Add another tablespoon. More salt to balance sweetness? Add a pinch. Remember: The flavor intensifies slightly as they chill, so don't make them overly sweet.
Step 3: Chill the Mixture (Important Step!)
Refrigerate before rolling: Cover the bowl with plastic wrap or a lid and refrigerate for at least 20-30 minutes. Why this step matters: Chilling firms up the mixture, making it much easier to roll into balls. Warm mixture is sticky and difficult to work with. The nut butter and honey solidify slightly in the cold, giving you better control.
Quick chill option: If you're in a hurry, place the bowl in the freezer for 10-15 minutes instead. Just don't forget about it!
Step 4: Roll into Balls
Prepare your workspace: Line a baking sheet or large plate with parchment paper or wax paper. This is where you'll place the finished energy balls.
Portion the mixture: Using a cookie scoop (1-tablespoon size works perfectly) or a spoon, scoop out about 1 tablespoon of the mixture at a time. A cookie scoop ensures uniform size - they'll all be the same!
Roll between your palms: Take the scooped portion and roll it between your palms using gentle, circular motions. Apply light pressure to compact it into a smooth, round ball. Pro tip: If the mixture sticks to your hands, lightly dampen your palms with water or a tiny bit of coconut oil.
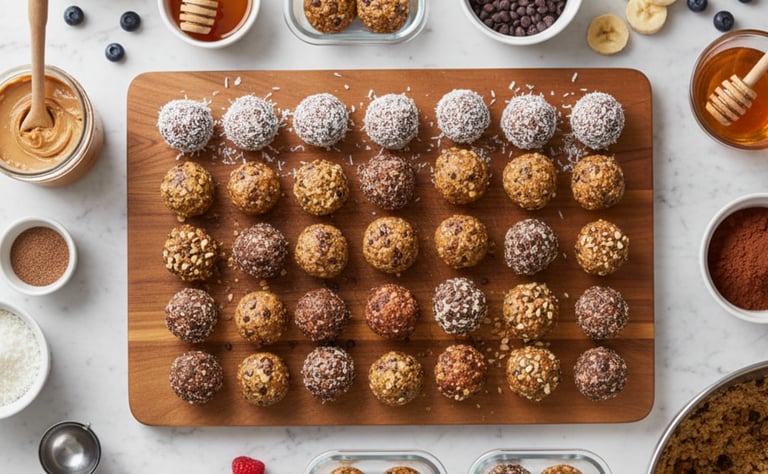
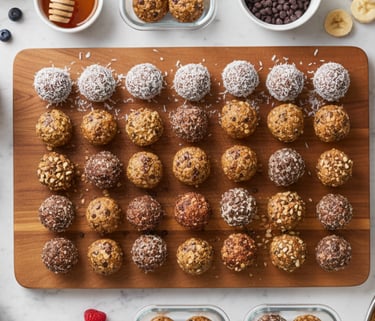
Size matters: Aim for balls about 1 to 1.5 inches in diameter - roughly the size of a walnut or golf ball. This size is perfect for one or two bites and provides a good snack portion. You should get 20-24 balls from this recipe.
Place on prepared sheet: As you roll each ball, place it on the parchment-lined baking sheet. Space them out slightly - they won't spread, but you want air circulation for even chilling.
Step 5: Optional Coatings
Roll in coatings (optional but fun!): For extra flavor and visual appeal, roll some of the energy balls in optional coatings:
Shredded coconut: Gives tropical flavor and pretty white coating
Cocoa powder: Makes them look like chocolate truffles
Crushed nuts: Adds extra crunch and protein
Sesame seeds or chia seeds: Adds texture and nutrition
Mix of coatings: Make a variety for visual interest!
How to coat: Pour your chosen coating into a small, shallow bowl. Roll each energy ball in the coating, pressing gently so it adheres. Place back on the baking sheet.
Step 6: Final Chill and Store
Refrigerate to set: Once all the balls are formed (and coated if desired), refrigerate the entire baking sheet for at least 30 minutes to 1 hour. This final chill helps them firm up completely and makes them easier to handle and store.
Check firmness: After chilling, the energy balls should be firm enough to pick up without leaving residue on your fingers, but still slightly soft and chewy when you bite in. They shouldn't be rock-hard or crumbly.
Step 7: Store and Enjoy
Transfer to storage container: Once fully chilled and firm, transfer the energy balls to an airtight container. You can stack them in layers, placing parchment or wax paper between layers to prevent sticking.
Storage options:
Refrigerator: Store in airtight container for 1-2 weeks. They taste best cold!
Freezer: Freeze in airtight container or freezer bags for up to 3 months. They stay soft enough to eat straight from the freezer, or thaw for 5-10 minutes.
Grab and go: These are perfect for:
Pre-workout or post-workout fuel
Mid-afternoon energy boost
Breakfast on-the-go
Healthy dessert alternative
Kids' lunchboxes
Travel snacks
Late-night sweet tooth satisfaction
Serving size: One to two energy balls makes a satisfying snack. They're nutrient-dense, so a little goes a long way! Each ball is approximately 100-120 calories with a good balance of protein, fiber, and healthy fats.
Variation 2: Chocolate Brownie Energy Balls
Ingredient Modifications:
Add: 1/4 cup cocoa powder
Add: 2 tablespoons extra honey (cocoa is dry, needs more moisture)
Replace: Mini chocolate chips with dark chocolate chips
Optional: 1/4 cup chopped walnuts for brownie texture
Instructions:
Mix cocoa powder with the oats before adding wet ingredients.
Add the extra honey to compensate for the dryness of cocoa.
Use dark chocolate chips for intense chocolate flavor.
Add chopped walnuts for classic brownie taste and texture.
Roll in cocoa powder for a truffle-like appearance.
These taste like brownie batter but are actually healthy!
Perfect for chocolate lovers who want a nutritious treat.
Variation 3: Almond Joy Energy Balls (Coconut + Chocolate)
Ingredient Modifications:
Replace: Peanut butter with almond butter
Add: 1/2 cup shredded unsweetened coconut (plus more for rolling)
Add: 1/4 cup mini chocolate chips
Add: 1/2 teaspoon coconut extract (optional)
Optional: Add chopped almonds for extra crunch
Instructions:
Use almond butter instead of peanut butter for authentic Almond Joy flavor.
Mix in 1/2 cup shredded coconut with the base ingredients.
Add coconut extract if you want intense coconut flavor.
Mix in mini chocolate chips and chopped almonds.
Roll the finished balls in additional shredded coconut.
These taste like the candy bar but with wholesome ingredients!
Store in refrigerator - the coconut keeps them fresh longer.
Variation 4: Lemon Blueberry Energy Balls
Ingredient Modifications:
Add: Zest of 2 lemons
Add: 1/2 cup dried blueberries, chopped
Replace: Chocolate chips with white chocolate chips (optional)
Add: 1 tablespoon lemon juice
Optional: 1/4 cup freeze-dried blueberries for intense flavor
Instructions:
Add lemon zest to the base mixture for bright citrus flavor.
Chop dried blueberries into smaller pieces so they distribute evenly.
Add lemon juice for extra tang (you may need 1-2 tablespoons more oats).
Mix in white chocolate chips for a sweet complement to the tart lemon.
These refreshing energy balls are perfect for summer!
The lemon-blueberry combo is light and energizing.
Roll in freeze-dried blueberry powder for a pop of color.
Variation 5: Pumpkin Spice Energy Balls (Fall Favorite)
Ingredient Modifications:
Add: 1/3 cup pumpkin puree (not pumpkin pie filling!)
Add: 1 teaspoon pumpkin pie spice
Add: 1/4 cup extra oats (pumpkin adds moisture)
Replace: Chocolate chips with white chocolate chips or dried cranberries
Optional: 1/4 cup chopped pecans
Instructions:
Mix pumpkin puree with the nut butter and honey.
Add pumpkin pie spice for that classic fall flavor.
Add extra oats to absorb the moisture from pumpkin puree.
Use white chocolate chips or dried cranberries instead of regular chocolate.
Add chopped pecans for autumn crunch.
These taste like pumpkin pie in ball form!
Perfect for fall but delicious year-round.
Roll in cinnamon-sugar mixture for extra fall vibes.
Variation 6: Protein Power Energy Balls (High-Protein)
Ingredient Modifications:
Add: 1/4 cup vanilla or chocolate protein powder
Add: 2 tablespoons extra nut butter (protein powder is dry)
Increase: Chia seeds to 1/4 cup for extra protein
Add: 1/4 cup hemp hearts or pumpkin seeds
Optional: Sugar-free chocolate chips for low-sugar option
Instructions:
Mix protein powder with dry ingredients before adding wet.
Add extra nut butter to compensate for the dryness of protein powder.
Increase chia seeds for plant-based protein boost.
Add hemp hearts or pumpkin seeds for additional protein and texture.
These pack about 5-6g protein per ball!
Perfect post-workout snack for muscle recovery.
Use plant-based protein powder for vegan version.
Chef's Tips & Pro Secrets:
The mixture should be slightly sticky: If you can roll it into balls that hold together without crumbling, it's perfect! Too dry = add more nut butter or honey. Too wet = add more oats or flaxseed.
Chill before rolling: This is non-negotiable! Warm mixture is impossible to roll. Always chill for at least 20-30 minutes first.
Use natural nut butter: The kind that separates with oil on top works best. Stir it well before using to redistribute the oils.
Ground flaxseed is key: It acts as a binder, adds nutrition (omega-3s!), and provides the perfect texture. Whole flaxseeds won't work - they need to be ground. Chia seeds can substitute.
Mini chips work better: Mini chocolate chips distribute more evenly throughout the mixture than regular-sized chips.
Taste as you go: Before rolling, taste the mixture and adjust sweetness, salt, or flavorings. It's easier to adjust now than after they're formed!
Wet hands prevent sticking: If the mixture sticks to your hands while rolling, dampen your palms slightly with water.
Size consistency matters: Use a cookie scoop for uniform balls. They'll all be the same size and provide consistent portions.
Coatings add variety: Roll different batches in different coatings - coconut, cocoa, crushed nuts - for a beautiful variety platter.
Make a double batch: These disappear quickly! Consider doubling the recipe and freezing half for later.
Customize freely: Energy balls are endlessly adaptable. Use what you have and what you love - there's no wrong combination!
Store properly: Always refrigerate or freeze. Room temperature makes them soft and oily.
Nutrition Information (Per Energy Ball - 1/20 of recipe):
Calories: 110
Protein: 3g
Carbohydrates: 13g
Fiber: 2g
Sugar: 7g (natural from honey)
Fat: 5g
Saturated Fat: 1g
Cholesterol: 0mg
Sodium: 25mg
Potassium: 85mg
Omega-3 Fatty Acids: 400mg (from flaxseed)
Iron: 4% DV
Calcium: 2% DV
Health Benefits - Why Energy Balls Are Good For You:
Energy balls are nutritional powerhouses packed into convenient bites! The oats provide complex carbohydrates for sustained energy and soluble fiber (beta-glucan) that supports heart health and helps lower cholesterol. They keep you full and provide steady energy without blood sugar spikes.
Nut butter contributes healthy monounsaturated fats, protein, vitamin E, and magnesium. These healthy fats support brain function, hormone production, and keep you satisfied for hours. The protein helps with muscle repair and satiety.
Ground flaxseed is a superfood addition - it's one of the best plant sources of omega-3 fatty acids (especially ALA), which support heart health, reduce inflammation, and promote brain function. Flax also provides lignans (antioxidants) and both soluble and insoluble fiber for digestive health.
Honey provides natural sweetness along with antioxidants, vitamins, and minerals. Unlike refined sugar, it contains beneficial compounds and doesn't spike blood sugar as dramatically. The small amount of dark chocolate chips adds antioxidants (flavonoids) and satisfies sweet cravings.
Energy balls provide balanced macronutrients - carbs for energy, protein for muscle support, and healthy fats for satiety - making them the perfect pre-workout fuel, post-workout recovery snack, or afternoon pick-me-up.
To make them even healthier: use raw honey, add more seeds (chia, hemp, pumpkin), increase nuts for more protein, use sugar-free chocolate chips, add superfood powders (maca, spirulina), or use date paste instead of honey for refined sugar-free version.
Frequently Asked Questions (FAQ):
Q: Can I use quick oats or instant oats instead of old-fashioned oats?
A: Not recommended. Quick oats are too fine and create a mushy texture. Steel-cut oats are too hard. Old-fashioned rolled oats provide the perfect texture and structure. They're essential for success!
Q: Why are my energy balls falling apart?
A: Too dry! Add more nut butter or honey, 1 tablespoon at a time, until the mixture holds together when squeezed. Also make sure you're using old-fashioned oats, not quick oats.
Q: Why are my energy balls too sticky?
A: Too much liquid! Add more oats or ground flaxseed, 1 tablespoon at a time, until the mixture is workable. Also, make sure you chill the mixture before rolling - chilling firms everything up.
Q: Can I make energy balls without nut butter?
A: Yes! Use sunflower seed butter or tahini for nut-free versions. You can also use coconut butter or even mashed banana (though you'll need extra oats to compensate for moisture).
Q: How long do energy balls last?
A: In the refrigerator: 1-2 weeks in an airtight container. In the freezer: up to 3 months. They stay soft enough to eat straight from the freezer!
Q: Can I use maple syrup instead of honey?
A: Absolutely! Maple syrup works perfectly and makes the recipe vegan. Use the same amount. Agave nectar also works.
Q: Do energy balls need to be refrigerated?
A: Yes! The nut butter and honey soften at room temperature, making them too sticky and oily. Always store in the refrigerator or freezer.
Q: Can I add protein powder to energy balls?
A: Yes! Add 1/4 cup protein powder and increase the nut butter by 2 tablespoons (protein powder is dry and absorbs moisture). Mix well to avoid a chalky texture.
Q: Are energy balls good for weight loss?
A: They can be! They're nutrient-dense and satisfying, preventing unhealthy snacking. However, they're calorie-dense (100-120 calories each), so portion control matters. Stick to 1-2 balls as a snack.
Q: Can kids help make energy balls?
A: Definitely! It's a perfect kid-friendly recipe - no heat, no sharp tools, and lots of hands-on mixing and rolling. Kids love helping and are more likely to eat healthy snacks they helped create!
Storage & Meal Prep Instructions:
Refrigerator Storage:
Store in airtight container for 1-2 weeks
Keep chilled at all times for best texture
Stack in layers with parchment paper between to prevent sticking
They taste best cold!
Freezer Storage (Highly Recommended!):
Place formed energy balls on parchment-lined baking sheet
Freeze for 1 hour until solid
Transfer to freezer-safe container or bags
Label with date and flavor
Freeze for up to 3 months
Eat straight from freezer (they're soft enough!) or thaw 5-10 minutes
Meal Prep Strategy:
Sunday Batch Prep:
Make 1-2 batches (40-48 energy balls)
Divide into daily portions (2 balls per portion)
Store in small containers or bags
Grab and go all week!
Perfect for lunchboxes, desk drawers, gym bags
Variety Pack:
Make 3 different flavors in one session
Color-code containers or use different coatings
Everyone gets their favorite variety!
Prevents flavor boredom
Portioning Tips:
Individual snack bags (2 balls each)
Small containers for lunch boxes
Keep some in your car for emergencies
Pack in gym bag for post-workout fuel
Troubleshooting Common Problems:
Mixture won't hold together/too crumbly? Not enough binding agent. Add more nut butter or honey, 1 tablespoon at a time, until it holds when squeezed.
Too sticky to roll? Too much liquid or mixture is too warm. Add more oats or flax, chill longer, or dampen hands with water while rolling.
Energy balls are too hard? Overchilled or too much oats. Let them sit at room temperature for 5-10 minutes to soften before eating.
Taste is bland? Needs more salt to balance sweetness, or add more vanilla. A pinch of salt makes huge difference!
Chocolate chips are unevenly distributed? Mix them in last after chilling the base mixture. This prevents them from sinking or clumping.
Balls are misshapen or uneven? Use a cookie scoop for consistent sizing, and roll firmly between palms using circular motion.
Coating won't stick? Roll the balls while they're still slightly sticky (before final chill), pressing coating gently to adhere.
What to Serve with Energy Balls:
Fresh fruit (apple slices, berries, banana)
Yogurt or Greek yogurt
String cheese or cheese cubes (protein pairing)
Raw vegetables with hummus
Smoothies (for complete breakfast)
Herbal tea or coffee
Almond milk or regular milk
Trail mix or nuts
Dark chocolate (for extra indulgence!)
Related Recipes You'll Love:
Snack Recipes:
Connect
Join our newsletter for fresh health tips
© 2026. All rights reserved.