Easy Homemade Hummus Recipe | Creamy, Smooth, and Authentic
Homemade hummus is a revelation - once you make it yourself, you'll never want to buy store-bought again. This creamy, silky-smooth Middle Eastern dip is made from simple ingredients like chickpeas, tahini, lemon juice, and garlic, yet it delivers complex, nutty, tangy flavors that are absolutely addictive. Whether you're spreading it on sandwiches, dipping fresh vegetables, scooping it with warm pita bread, or using it as a healthy snack, homemade hummus is fresher, tastier, and healthier than anything you'll find in a plastic tub at the grocery store.
What makes homemade hummus so much better? You control the ingredients and flavors completely - no preservatives, no excess sodium, no mystery ingredients. You can adjust the garlic level, make it as lemony or mild as you like, and achieve that ultra-smooth, restaurant-quality texture that store-bought versions never quite match. Plus, it's incredibly economical - a batch of homemade hummus costs a fraction of what you'd pay for premium brands, using pantry staples you probably already have.
Hummus is also remarkably versatile and practical. It's naturally vegan, gluten-free, high in protein and fiber, and packed with nutrients. It keeps in the refrigerator for up to a week, making it perfect for meal prep. Use it as a healthy snack with vegetables, spread it on sandwiches instead of mayo, dollop it on grain bowls, or serve it as an impressive appetizer for guests. The best part? It takes just 10 minutes to make from start to finish.
This foolproof recipe delivers authentic, ultra-creamy hummus with that perfect balance of nutty tahini, bright lemon, aromatic garlic, and earthy chickpeas. You'll learn the secrets to achieving restaurant-quality smoothness, the right flavor balance, traditional techniques, and creative variations. Let's make the best hummus you've ever tasted!
Prep Time: 10 minutes
Total Time: 10 minutes
Serves: 8 (makes about 2 cups)
Difficulty: Easy
Cuisine: Middle Eastern, Mediterranean
Diet: Vegan, Gluten-free, Dairy-free
Meal Prep Friendly: Keeps for 1 week
Budget-Friendly: Much cheaper than store-bought
High-Protein: 4g per serving
Ingredients
For Classic Hummus:
1 can (15 oz) chickpeas (garbanzo beans), drained and rinsed
1/4 cup fresh lemon juice (about 1 large lemon)
1/4 cup tahini (well-stirred)
1 small garlic clove, minced (or 1/2 large clove)
2 tablespoons extra virgin olive oil, plus more for serving
1/2 teaspoon ground cumin
Salt to taste (start with 1/2 teaspoon)
2-3 tablespoons cold water (as needed for consistency)
Optional: Pinch of paprika for garnish
For Ultra-Smooth Texture (Secret Ingredient):
1/2 teaspoon baking soda (for peeling chickpeas - optional but recommended)
For Serving:
Extra virgin olive oil for drizzling
Paprika, sumac, or za'atar for garnish
Fresh parsley, chopped
Whole chickpeas for topping
Pine nuts (toasted)
Warm pita bread, pita chips, or fresh vegetables
How to Make Homemade Hummus
Instructions:
Step 1: Prepare the Chickpeas (Secret to Ultra-Smooth Hummus)
Drain and rinse canned chickpeas: Open the can of chickpeas and drain the liquid (aquafaba - you can save this for other recipes!). Rinse the chickpeas thoroughly under cold running water in a colander. This removes excess sodium and the slightly metallic taste from the can.
Remove the skins (optional but recommended for smoothness): This is the secret to ultra-smooth, restaurant-quality hummus! There are two methods:
Method 1 - Baking Soda Peeling (easiest):
Place drained chickpeas in a small pot and cover with water
Add 1/2 teaspoon baking soda
Bring to a boil over high heat
Boil for 3-4 minutes - the skins will start floating to the surface
Drain and rinse with cold water
The skins will slip off easily - gently rub chickpeas between your hands or a kitchen towel
Don't worry if some skins remain - removing most is enough
Method 2 - Manual Peeling (time-consuming but effective):
Gently pinch each chickpea between your thumb and forefinger
The skin will slip right off
Discard the skins
This takes about 10 minutes but creates the smoothest hummus
Why remove skins? The skins (shells) are what make hummus grainy and gritty. Removing them creates that silky-smooth, ultra-creamy texture you find in authentic Middle Eastern hummus. Can you skip this step? Yes, but your hummus will be slightly grainy. For quick hummus, it's fine to skip.
Step 2: Blend the Tahini and Lemon (Foundation of Flavor)
Start with tahini and lemon: This is a traditional technique! In the bowl of your food processor, combine 1/4 cup tahini and 1/4 cup fresh lemon juice. Important: Process these two ingredients together FIRST, before adding anything else. Blend for about 1 minute.
The magic happens: As you process, the mixture will first seize up and become very thick and pasty - this is normal! Keep processing. After about 30-60 seconds, it will suddenly transform into a smooth, creamy, almost whipped texture that's much lighter in color. This is what you want!
Why this step matters: Processing tahini and lemon juice together first creates a smooth, emulsified base. The acid from the lemon helps break down the tahini and creates that characteristic creamy texture. If you add everything at once, you won't achieve the same smoothness.
Scrape down the sides: Stop the food processor and scrape down the sides with a spatula to ensure everything is evenly mixed.
Step 3: Add Remaining Ingredients and Blend
Add garlic, cumin, and salt: Add the minced garlic clove, 1/2 teaspoon ground cumin, and 1/2 teaspoon salt to the tahini-lemon mixture. Pro tip on garlic: Start with less! You can always add more, but you can't take it away. Raw garlic can be quite strong, so if you're sensitive to garlic, start with half a clove.
Process to combine: Blend for 30 seconds to incorporate the seasonings into the tahini base. The mixture should smell amazing - bright from the lemon, aromatic from the garlic and cumin.
Add the chickpeas: Add the prepared chickpeas (peeled or unpeeled, depending on your preference) to the food processor. Reserve a few whole chickpeas for garnish if desired.
Add olive oil: Drizzle in 2 tablespoons of extra virgin olive oil. The oil adds richness, flavor, and helps create a smooth texture.
Blend until smooth: Process for 1-2 minutes, stopping to scrape down the sides once or twice. You want to blend until the mixture is very smooth and creamy. Important: Don't rush this step! The longer you blend (within reason), the smoother your hummus will be.
Check the texture: Stop the food processor and check the consistency. The hummus should be very smooth and thick but not like paste. It should have the consistency of thick Greek yogurt - it should hold its shape but still be creamy.
Step 4: Add Water and Adjust Consistency
Add cold water gradually: With the food processor running, slowly drizzle in cold water, 1 tablespoon at a time, through the feed tube. The water helps thin the hummus to the perfect creamy, scoopable consistency.
How much water? Start with 2 tablespoons and assess. You may need 2-4 tablespoons total, depending on how thick your tahini is and how creamy you like your hummus. The hummus will thicken slightly as it chills, so make it slightly thinner than your ideal consistency.
The perfect consistency: When done, the hummus should be smooth, creamy, and light - almost fluffy. It should easily spread with a spoon and have a soft, pillowy texture. If you lift a spoonful and let it drop back into the bowl, it should slowly settle and self-level.
Process longer for extra smoothness: For ultra-smooth, professional-quality hummus, let the food processor run for a full 3-4 minutes total. This extra processing time creates that silky texture. If your food processor starts to heat up, pause and let it cool for a minute.
Step 5: Taste and Adjust Seasonings
Taste the hummus: This is crucial! Scoop out a small spoonful (use a clean spoon) and taste. Hummus needs proper seasoning to shine.
Adjust flavors to perfection:
Too bland? Add more salt, 1/4 teaspoon at a time
Not tangy enough? Add more lemon juice, 1 tablespoon at a time
Want more garlic? Add another clove (but blend well - raw garlic intensifies)
Need more depth? Add a pinch more cumin
Want it nuttier? Add more tahini, 1 tablespoon at a time
Remember: Flavors will develop and intensify as the hummus chills. If it tastes perfect now, it will taste even better after 30 minutes in the refrigerator.
Blend after adjustments: If you add more ingredients, blend for another 30-60 seconds to fully incorporate them.
Step 6: Serve
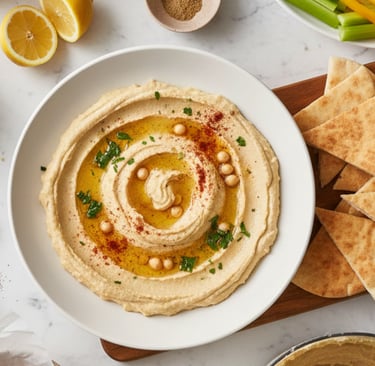
Transfer to serving bowl: Spoon the hummus into a shallow serving bowl or plate. For traditional presentation, use a wide, shallow bowl - this allows you to create the classic crater in the center.
Create the traditional crater: Using the back of a large spoon, make a circular motion from the center outward, creating a well or crater in the middle of the hummus. This indent will hold the olive oil and garnishes beautifully.
Drizzle with olive oil: Generously drizzle extra virgin olive oil into the crater and over the top of the hummus. Don't be shy - good olive oil adds incredible flavor! Use your best quality olive oil here.
Garnish beautifully: Traditional garnishes include:
Sprinkle of paprika (sweet or smoked)
Pinch of ground cumin
Za'atar or sumac (if you have them)
Fresh chopped parsley
A few whole chickpeas
Toasted pine nuts
A drizzle of pomegranate molasses (for special occasions)
Serve with: Warm pita bread (torn into pieces), pita chips, fresh vegetables (carrots, cucumber, bell peppers, celery), crackers, or use as a spread for sandwiches and wraps.
Serving temperature: Hummus can be served immediately, but it tastes best after chilling in the refrigerator for at least 30 minutes. This allows the flavors to meld and the texture to firm up slightly.
Variation 2: Roasted Red Pepper Hummus
Additional Ingredients:
1/2 cup roasted red peppers (from jar, drained and patted dry)
1/4 teaspoon smoked paprika
Pinch of cayenne pepper (optional)
Instructions:
Follow main recipe through step 11.
Add roasted red peppers (well-drained and patted dry) with the chickpeas.
Add smoked paprika and cayenne for extra flavor.
Blend until completely smooth and the hummus has a beautiful orange-pink color.
The roasted peppers add sweetness and a mild smoky flavor.
Garnish with extra roasted red pepper strips and a drizzle of olive oil.
This version is slightly sweeter and milder than classic hummus.
Variation 3: Roasted Garlic Hummus (Extra Flavorful)
Additional Ingredients:
1 whole head of garlic, roasted
1 tablespoon extra olive oil
Instructions:
Roast the garlic ahead: Cut top off garlic head, drizzle with olive oil, wrap in foil, roast at 400°F for 35-40 minutes until soft and golden.
Let cool, then squeeze roasted garlic cloves out of their skins.
Follow main recipe, replacing raw garlic with 6-8 roasted garlic cloves.
The roasted garlic is sweet, mellow, and nutty - not harsh like raw garlic.
Blend until smooth.
This version is rich, deeply flavored, and addictively garlicky without being overpowering.
Perfect for garlic lovers!
Variation 4: Spicy Jalapeño Cilantro Hummus
Additional Ingredients:
1-2 fresh jalapeños, seeded and chopped
1/2 cup fresh cilantro leaves
1/2 teaspoon ground coriander
Extra lime juice instead of lemon (optional)
Instructions:
Remove seeds from jalapeños for less heat (keep them for extra spice).
Follow main recipe, adding chopped jalapeños and cilantro with the chickpeas.
Add ground coriander for complementary flavor.
For a more Latin twist, use lime juice instead of lemon juice.
Blend until completely smooth and bright green.
Taste and adjust heat level - add more jalapeño if desired.
This fresh, spicy version is perfect for Mexican-inspired dishes!
Variation 5: Sun-Dried Tomato and Basil Hummus
Additional Ingredients:
1/3 cup sun-dried tomatoes in oil, drained
1/4 cup fresh basil leaves
1 tablespoon balsamic vinegar
Extra Parmesan for garnish (optional)
Instructions:
Drain sun-dried tomatoes well (save the oil for other uses).
Follow main recipe, adding sun-dried tomatoes and fresh basil with chickpeas.
Add balsamic vinegar for depth.
Reduce lemon juice slightly to 3 tablespoons since balsamic adds acidity.
Blend until smooth with flecks of tomato and basil visible.
This Italian-inspired version is rich and savory.
Garnish with fresh basil leaves and grated Parmesan.
Variation 6: Chocolate Dessert Hummus (Sweet Version)
Ingredient Modifications:
Omit: Garlic, cumin, and salt
Add: 1/4 cup cocoa powder
Add: 1/4 cup maple syrup or honey
Add: 1 teaspoon vanilla extract
Replace: Lemon juice with 2 tablespoons water
Optional: 1/4 cup chocolate chips
Instructions:
Follow basic method but omit all savory ingredients.
Blend chickpeas with tahini, cocoa powder, maple syrup, and vanilla.
Add water to thin instead of lemon juice.
Blend until ultra-smooth and creamy.
The result tastes like chocolate frosting but is made from chickpeas!
Serve with fruit, pretzels, or graham crackers.
This healthy dessert dip is a hit with kids!
Chef's Tips & Pro Secrets:
Quality tahini makes a difference: Use fresh, high-quality tahini (sesame paste). Avoid tahini that's separated or has a bitter aftertaste. Well-stirred tahini should be smooth and pourable.
Fresh lemon juice only: Bottled lemon juice doesn't taste the same! Fresh-squeezed lemon juice adds bright, vibrant flavor that's essential to great hummus.
Process tahini and lemon first: This traditional technique is the secret to ultra-smooth, creamy hummus. Don't skip this step!
Ice-cold water is key: Cold water helps create a lighter, fluffier texture. Room temperature or warm water doesn't work as well.
Blend longer than you think: Most people don't blend long enough! A full 3-4 minutes of processing creates that professional silky smoothness.
Remove chickpea skins for smoothest texture: This takes effort but makes a dramatic difference. The baking soda method is easiest!
Start with less garlic: Raw garlic is potent! You can always add more, but you can't remove it. Start with less and adjust.
Use your best olive oil for serving: The drizzle on top is where you'll really taste the olive oil, so use good quality extra virgin olive oil.
Let flavors develop: Hummus tastes better after chilling for 30+ minutes. The flavors meld and become more balanced.
Thin with pasta water: For an ultra-creamy texture, use warm chickpea cooking water (if using dried chickpeas) or reserved aquafaba from canned chickpeas instead of plain water.
Make it from dried chickpeas: For the absolute best texture, cook dried chickpeas from scratch. They're softer and creamier than canned. Soak overnight, cook until very tender (about 1 hour).
Store properly: Always store in an airtight container with plastic wrap pressed directly on the surface to prevent oxidation and drying out.
Nutrition Information (Per Serving - 1/4 cup):
Calories: 120
Protein: 4g
Carbohydrates: 11g
Fiber: 3g
Sugar: 1g
Fat: 7g
Saturated Fat: 1g
Cholesterol: 0mg
Sodium: 150mg (varies with salt added)
Potassium: 140mg
Calcium: 4% DV
Iron: 8% DV
Vitamin C: 8% DV
Health Benefits - Why Hummus is Good For You:
Hummus is a nutritional powerhouse that's delicious and healthy! Chickpeas are excellent sources of plant-based protein (4g per serving) and fiber (3g), which support digestive health, keep you full, and help stabilize blood sugar. The fiber in chickpeas feeds beneficial gut bacteria and promotes regularity.
Chickpeas also provide important minerals like iron (8% DV), magnesium, potassium, and folate. These nutrients support energy production, heart health, and red blood cell formation. The complex carbohydrates in chickpeas provide sustained energy without blood sugar spikes.
Tahini (sesame paste) contributes healthy fats, additional protein, calcium, and powerful antioxidants called lignans. Sesame seeds are one of the best plant sources of calcium and provide copper, manganese, and magnesium for bone health.
Olive oil adds heart-healthy monounsaturated fats that support cardiovascular health and reduce inflammation. Lemon juice provides vitamin C and enhances iron absorption from the chickpeas. Garlic contains allicin and other sulfur compounds with immune-boosting and anti-inflammatory properties.
Hummus is naturally vegan, gluten-free, and cholesterol-free, making it suitable for almost any diet. It's a complete protein when eaten with whole grains (like pita bread), providing all essential amino acids.
To make hummus even healthier: reduce olive oil slightly, add roasted vegetables for extra nutrients, use it as a replacement for mayo or cream cheese, pair with raw vegetables instead of chips, or add extra garlic for immune support.
Frequently Asked Questions (FAQ):
Q: Can I make hummus without tahini?
A: Tahini is traditional and provides the characteristic nutty flavor and creamy texture. However, you can substitute with: extra olive oil (not as smooth), Greek yogurt (not vegan), sunflower seed butter, or even peanut butter (different flavor). The result won't be authentic hummus but will still be delicious!
Q: Why is my homemade hummus grainy or gritty?
A: The chickpea skins! Remove them using the baking soda method or manual peeling. Also, blend for longer - at least 3-4 minutes total for smooth texture.
Q: Can I use dried chickpeas instead of canned?
A: Yes, and it's even better! Soak 3/4 cup dried chickpeas overnight, then cook until very tender (1-1.5 hours). Homemade chickpeas are softer and create creamier hummus. Save the cooking liquid (aquafaba) to thin the hummus.
Q: How long does homemade hummus last?
A: Store in an airtight container in the refrigerator for 5-7 days. Press plastic wrap directly on the surface to prevent oxidation. If the top darkens slightly, just stir it back in.
Q: Can I freeze hummus?
A: Yes! Freeze in airtight containers for up to 3 months. Thaw overnight in refrigerator. The texture may be slightly grainy after freezing - stir well and add a splash of water or olive oil to restore creaminess.
Q: Why does my hummus taste bitter?
A: Old or rancid tahini is the usual culprit. Check the expiration date on your tahini. Also, too much raw garlic can taste bitter - use less next time or try roasted garlic instead.
Q: How do I make hummus thicker or thinner?
A: Too thin: Add more chickpeas or tahini and blend. Too thick: Add cold water, 1 tablespoon at a time, while blending until you reach desired consistency.
Q: What kind of tahini should I buy?
A: Look for tahini made from 100% hulled sesame seeds with no added ingredients. Middle Eastern brands are usually best. It should be smooth and pourable when stirred, not separated or grainy.
Q: Can I make hummus in a blender instead of food processor?
A: Yes, but a food processor works better. If using a blender, you may need to add more liquid and stop to scrape down the sides more frequently. A high-powered blender (like Vitamix) works great!
Q: Why is my hummus separating (oil on top)?
A: This is normal! The oil rises to the top during storage. Just stir it back in before serving. For presentation, drain excess oil before plating, then drizzle fresh oil on top.
Storage & Serving Instructions:
Refrigerator Storage:
Store in airtight container for 5-7 days
Press plastic wrap directly on surface to prevent drying and oxidation
Pour a thin layer of olive oil on top for extra protection
Always use clean utensils when scooping to prevent contamination
Freezer Storage:
Portion into small airtight containers or freezer bags
Leave 1/2 inch headspace for expansion
Label with date
Freeze for up to 3 months
Thaw overnight in refrigerator
Stir well after thawing - add splash of water or olive oil if needed
Serving Tips:
Bring to room temperature before serving (30 minutes)
Stir well if oil has separated
Always drizzle fresh olive oil on top before serving
Warm pita bread for the authentic experience
Garnish fresh each time for best presentation
Make-Ahead:
Make 2-3 days ahead for best flavor development
Flavors meld and improve over time
Perfect for party prep
Uses Beyond Dipping:
Spread on sandwiches instead of mayo
Base for grain bowls
Salad dressing (thin with water)
Pizza sauce alternative
Pasta sauce (thin with pasta water)
Deviled egg filling
Baked potato topping
Troubleshooting Common Problems:
Hummus is too thick/pasty? Add cold water, 1 tablespoon at a time, while blending until desired consistency.
Hummus is too thin/runny? Add more chickpeas or tahini and blend. Or refrigerate - it thickens as it chills.
Hummus tastes bland? Needs more salt! Also check lemon juice (needs brightness) and garlic (needs depth). Season generously.
Hummus is grainy/gritty? Chickpea skins weren't removed, or didn't blend long enough. Blend for 3-4 full minutes for smoothness.
Hummus tastes bitter? Old/rancid tahini or too much raw garlic. Use fresh tahini and reduce garlic.
Food processor is overheating? Stop and let it cool for 2-3 minutes, then continue. Or blend in batches if making large quantity.
Hummus is separating? Normal! Oil rises to top. Just stir back in before serving.
What to Serve with Hummus:
For Dipping:
Warm pita bread, torn into pieces
Pita chips (homemade or store-bought)
Fresh vegetables (carrots, cucumbers, bell peppers, celery, radishes, cherry tomatoes)
Crackers or flatbread
Pretzel sticks
Baked tortilla chips
As Part of a Mezze Platter:
Baba ganoush (roasted eggplant dip)
Tzatziki (cucumber yogurt dip)
Dolmas (stuffed grape leaves)
Falafel
Olives and pickled vegetables
Feta cheese cubes
Tabbouleh salad
Other Uses:
Spread on sandwiches and wraps
Base for Buddha bowls
Pizza sauce alternative
Salad dressing (thinned)
Baked potato topping
Veggie burger spread
Related Recipes You'll Love:
Snack Recipes:

Connect
Join our newsletter for fresh health tips
© 2026. All rights reserved.